Flash 5 - Part 4: Timelines, Frames and Layers
Introduction
After the previous article about basic drawing you should be able to draw shapes without too much of a problem. All the drawing so far happened on a single KeyFrame (and also on a single Layer).
This article will cover all the basics of layers, KeyFrames, Frames, morph/tweens and symbols.
The Time-line
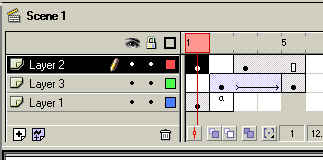
The following example time-line lasts for 5 frames, which means if we're running at 12 fps would last for 2.4 seconds.
- The Red-line shows the current frame we are editing (and viewing). Click on the ruler above the time-line to quickly find a particular frame.
- The Black Layer name ('Layer 2') means we are working on that particular layer. ALL pastes and drawing will place items onto this layer.
- A black dot means something is in a KeyFrame. And likewise no black dot means an empty, blank frame.
- A small 'a' means some action-scripting is attached to that particular KeyFrame. We'll look at action-scripting in a later article.
KeyFrames and Frames
A Frame is basically a 'repeat the last KeyFrame' marker. They are used to denote how long some item (for example an animation) should last before being deleted and (possibly) replaced with a new KeyFrame.
Let's take another look at that time-line example. It has a total of 8 KeyFrames and just 4 Frames.
- Layer 2 has 1 KeyFrame, 1 Blank KeyFrame, 1 KeyFrame + 2 Frames (note: the small, white, square box)
- Layer 3 has 1 Blank KeyFrame, 1 KeyFrame + 2 Frames (tween) + 1 end KeyFrame
- Layer 1 has 1 KeyFrame, 1 Blank KeyFrame with an action.
Tip: To make life easier, choose one of the options on the far right time-line menu (click that little ruler-like symbol) and use Large or Preview to make the time-line zoom in.
The Time-line right Menu
Right-Click on a frame on the time-line and you can choose one of the options. These include Insert Frame (ie. repeat the last KeyFrame), Insert KeyFrame (which copies the contents of the previous frame -- this is very, very useful when creating buttons or tweening where you need to duplicate stuff) and Insert Blank KeyFrame (this basically insert a KeyFrame but without copying the previous one).
Once you have a 2-frame block (1 KeyFrame + 1 Frame) you will see a little, white square on the time-line. This can be dragged left or right to make an animation last shorter or longer.
Insert Frame and Delete Frame will perform the normal insert and delete on the currently selected Layer(s).
Motion Tweens
Okay, enough explanations, let's create a very simple tween. So start Flash with a new, blank movie and then draw a simple shape on the work-area stage. Select the entire shape and Use Insert-->Convert To Symbol to move the shape into the Library and Place an Instance of the new symbol where the shape previously was (Gee, I hope that kinda made sense ;)
Now Right-Click on the time-line at about frame 20 and choose Insert KeyFrame. Drag the instance in frame 20 to a different place on the work-area. Right-click on frame 1 and choose Create Motion Tween. There should be a arrow on the blue time-line to indicate a motion tween.
Congratulations, you have just created an animation! easy huh?
Shape Tweening
Individual time-lines
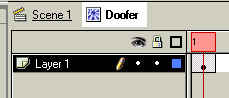
In the above screen shot we are editing a symbol (in the Library) called 'Doofer' which only has a single Layer and 1 KeyFrame. We could extend this to perform another animation. This animation is independant of the main 'Scene' time-line. So animations can have their own number of frames and can loop (and be controlled) using action-scripting.
Layers
These behave exactly like the normal PhotoShop (and every other paint package) layers. Items can be placed so that they overlap or simply tween independently of each other.
Let's have a look at those 3 icons above each of the layer names. The first one (the eye) should be obvious, it hides or shows each layer. The Lock prevents items from be editing on a layer (although you can still mess up the time-line and frames ;-) The last (box) icon will display each layer as either a WireFrame or Solid (normal, default mode). The wireframe mode is useful to check for small gaps in shapes and to see the Snap Grid through the background.
These 3 options can be applied to each layer (by clicking the small black dot on each layer name) or to ALL the layers by clicking on the top 3 icons.
I won't cover the Guide-Layers and Mask-Layers because there are some tutorials built into Flash's help. Guide-Layers are used to make Instances follow a user-drawn path and Mask-Layers can be used to perform wipes, fades and other pop-up like effects.
Tip: You can drag items between layers by dragging a Frame (or number of Frames) from one layer to another. You can also use the Right-menu Copy/Cut Frames and Paste Frames too.
Closing words
The next part will look at some Buttons and then Action-Scripting, until then remember to place each Tween or Morph on its own layer!
Happy Tweening